-5% on your order in the app
You're standing in the arrivals hall with no signal, airport Wi-Fi that won't connect, and an email saying your eSIM is ready. The QR code is on the same phone you're trying to connect. Do you open the camera, take a screenshot, or tap something in Settings?
An eSIM QR code is a delivery step, not the eSIM itself. Once you separate reading the code, downloading the profile, and connecting the line, setup becomes easier to follow. You can also fix the right problem instead of scanning the same image again.
Where Your eSIM QR Code Comes From and What It Holds
Your eSIM QR code gives your phone the information it needs to request a mobile service profile. It doesn't contain a miniature SIM card, and saving its picture doesn't install anything.
The code carries an activation string containing a provisioning server address and an identifier for your assigned profile. Your phone's Local Profile Assistant, its built-in eSIM management software, contacts that server, authenticates the request, and downloads the encrypted profile. The GSMA guide to eSIM architectures explains that the profile is encrypted between the provisioning server and the phone's secure eSIM hardware.
Practical rule: Having the QR code means you have the installation instructions. It doesn't mean your phone has downloaded the line or connected to a network.
Where to find your installation details
After purchasing through Simsima, your QR code arrives by email and is also available in your account. Keep the accompanying activation details, not just the image, because they provide a fallback if scanning fails.
Where the eSIM QR code appears and what to check
| Where it appears | When it usually arrives | What to check |
|---|---|---|
| Provider confirmation email | Within minutes of purchase | Check for the QR image; look in spam or promotions if missing |
| Provider account or order page | Right after checkout | Screenshot the code and save the activation details |
| Carrier welcome message or app | When the carrier issues its activation instructions | Confirm it's an eSIM offer, not a request for a physical SIM |
| Printed card or in-store kit | Before departure | Keep the card until the eSIM is installed on your phone |
Look for an installation button beside the image, too. You may not need your camera at all.
Check eligibility before flying
On iPhone, open Settings > Cellular and look for Add eSIM. On Android, search Settings for eSIM and confirm that an installation screen appears. If neither option appears, don't buy until you've confirmed the exact model's compatibility and carrier restrictions.
Apple's eSIM setup guidance lists iPhone XS, iPhone XS Max, iPhone XR, and later models, subject to regional and carrier support. A familiar model name alone isn't enough to establish eligibility.
Before departure:
- Confirm delivery: Find the installation email while you still have reliable internet.
- Save private copies: Store the screenshot in Photos and the activation details in a secure note.
- Verify compatibility: Confirm both eSIM support and an open device.
Install using home Wi-Fi when the plan's activation rules allow it. For broader preparation, Madeira Remote's guide to manage mobile data while traveling can help you think through your connection needs beyond installation.
How to Scan and Install an eSIM QR Code on iPhone
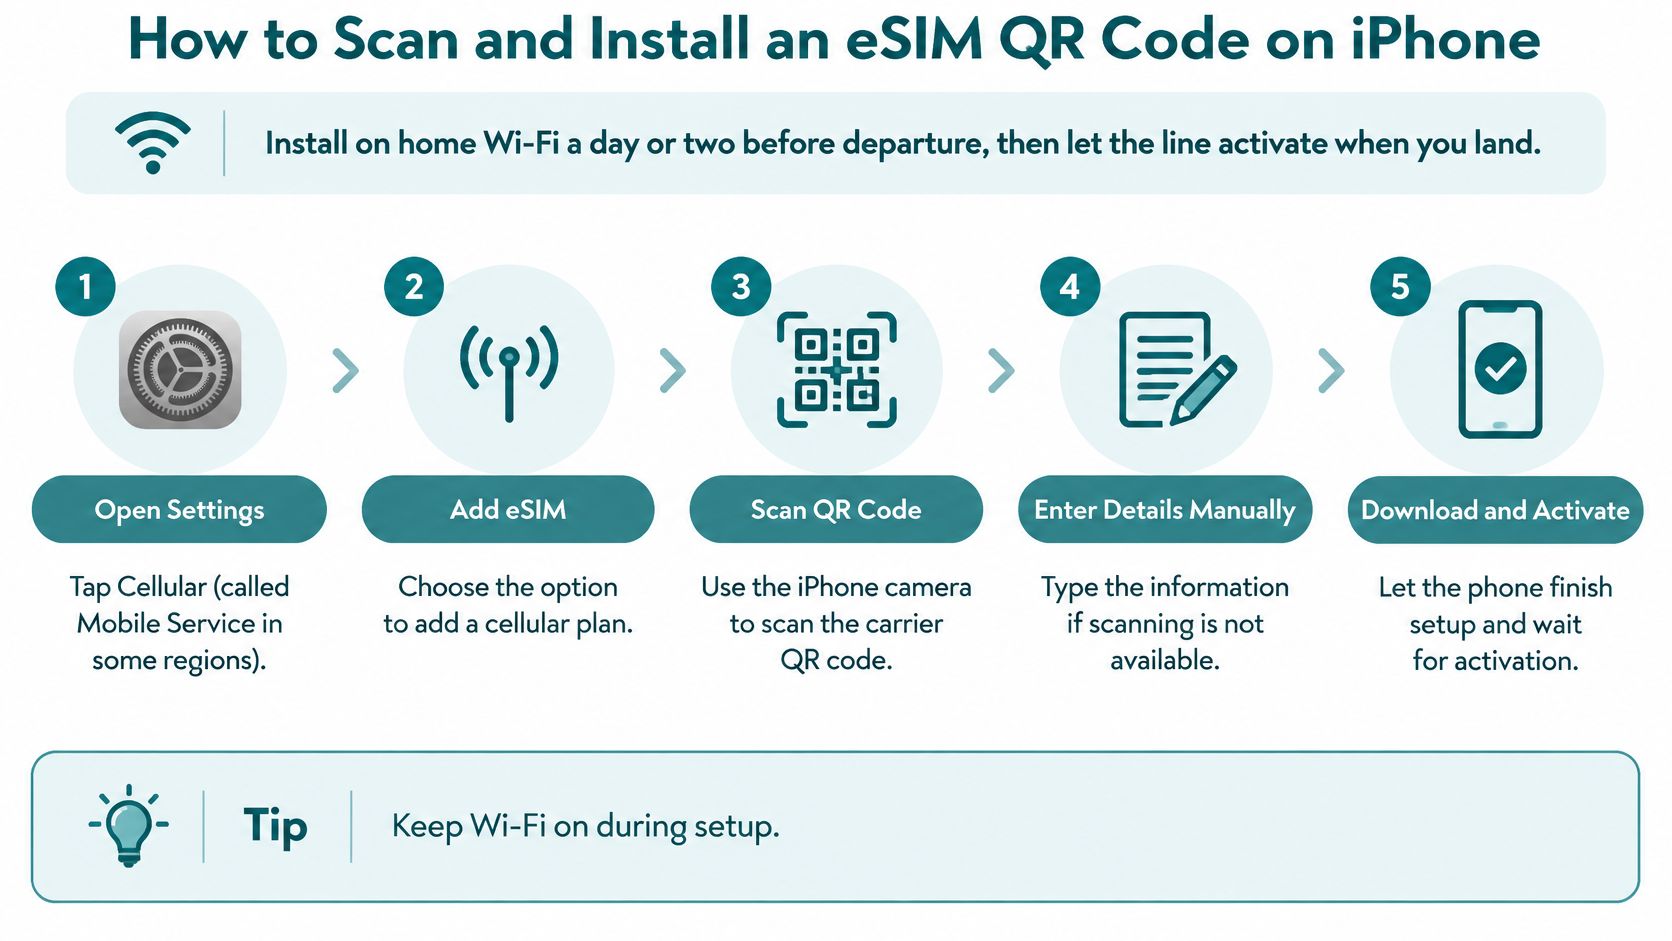
Aim to install on home Wi-Fi before departure, then connect the travel line when you arrive. Check when your plan's validity begins first, because installation and the start of paid service aren't always separate events.
Use our eSIM-supported devices checker before starting if you're unsure about your exact phone. Our delivery process sends installation details by email within seconds of purchase, and installation takes under 2 minutes through Smart Link on compatible iPhones running iOS 17.4 or later, Android, or a QR code scan.
This visual summarizes the available installation routes.
Follow the iPhone setup screens
- Open Settings > Cellular > Add eSIM. Cellular may be called Mobile Service or Mobile Data, depending on your region.
- Tap Use QR Code. Center the entire code inside the camera frame, using another screen or a printed copy. If the email is on your iPhone, supported software also lets you press and hold the QR image and select Add eSIM.
- Tap Continue when the carrier details appear. Keep Wi-Fi connected while the phone downloads the profile, and allow the setup screen to finish.
- Enter a confirmation code only if prompted. Use the code supplied with your installation details, not your phone's passcode.
- Label the new line Travel. A recognizable label helps you avoid changing your home line's settings by mistake.
- Select Travel for Cellular Data when you're ready to use it. This setting decides which line carries mobile data. Leave cellular data switching off if you don't want the phone falling back to your home line.
- Open the Travel line and enable Data Roaming when required by its instructions. Return to Cellular and check that your home and travel lines are listed.
If you're installing ahead of departure, you can prepare the settings and leave the travel line off until arrival. Don't assume it must receive a signal at home, particularly if your home country isn't covered.
The video offers another way to follow the on-screen sequence.
A successful installation leaves the travel line in your Cellular list with no unfinished installation prompt. Installed is not the same as connected: network registration may wait until you reach a covered destination.
How to Scan and Install an eSIM QR Code on Android
Android manufacturers use different menu names, but you're looking for the same function: the phone's built-in eSIM setup screen. Open that screen rather than a generic QR-reader app, which might display the activation text without installing anything.
Connect to working Wi-Fi and keep the phone charged before starting. If your code is displayed on another device, keep that screen awake while you scan.
A code on a card or another screen gives the camera something it can read.
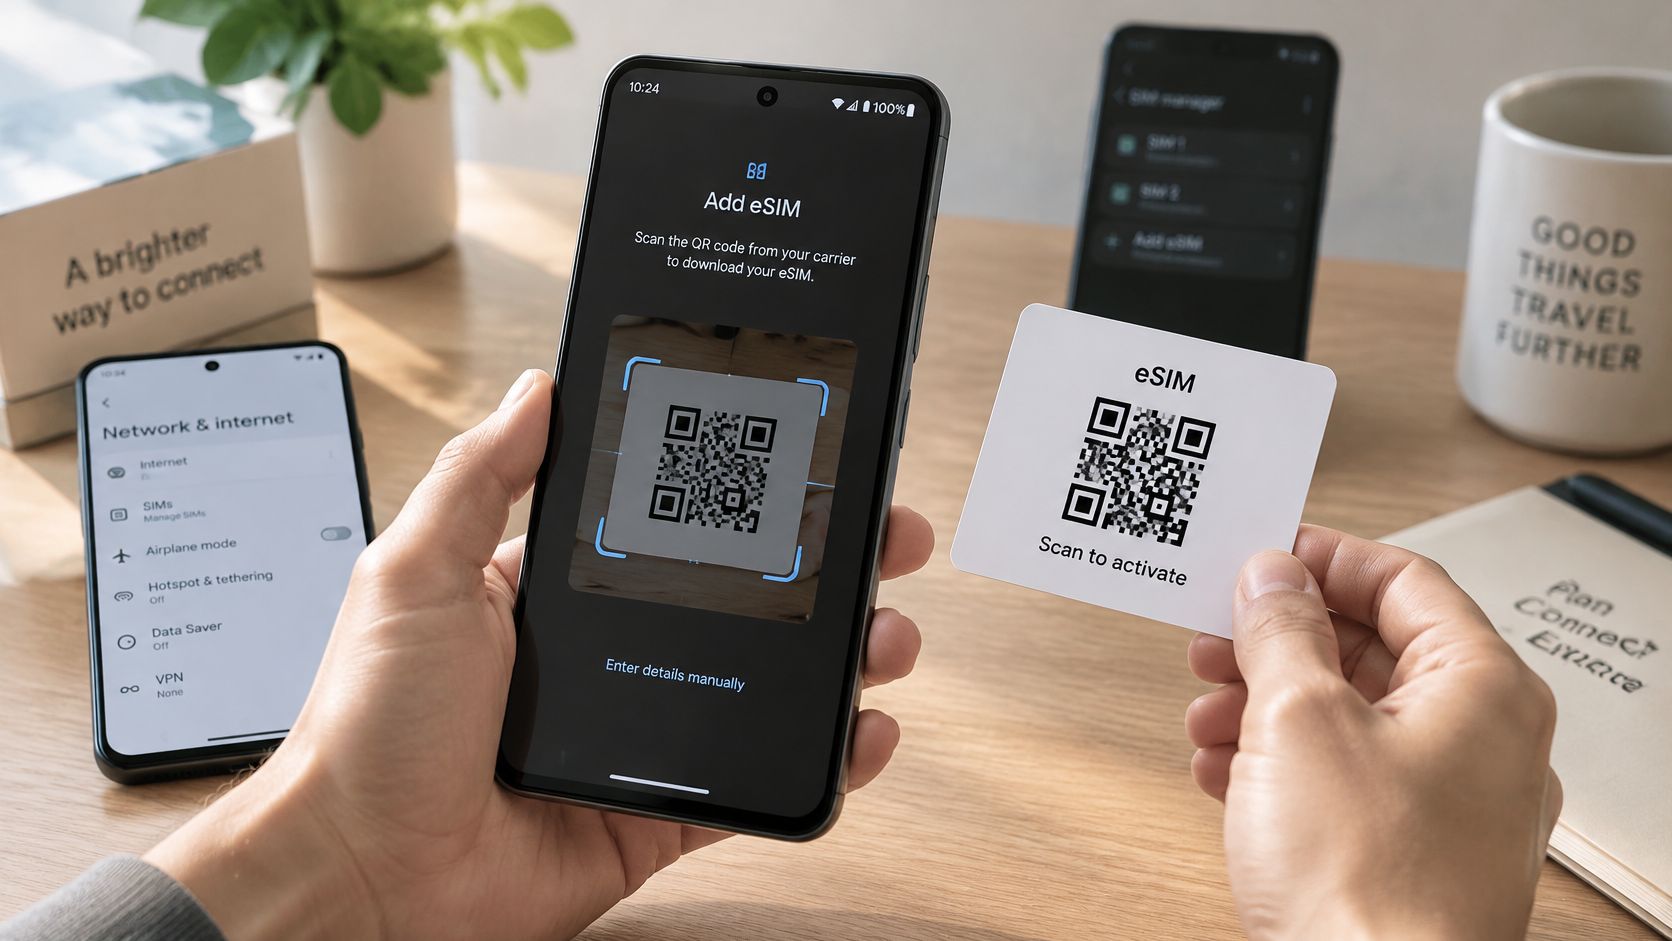
Google Pixel
The Pixel installation flow documented in AT&T's device support guide uses Settings > Network & internet > SIMs > Set up an eSIM, followed by scanning the carrier code and tapping Set up.
Keep the full square visible rather than moving the camera close enough to crop its edges. When the phone recognizes it, follow the download prompts instead of trying to scan again.
Samsung Galaxy
On Samsung-style menus, use:
Settings > Connections > SIM manager > Add eSIM > Scan QR code
Scan the image, then tap Add when the phone identifies the plan. Wait for the new line to appear in SIM manager before leaving the setup screen.
If your screen looks different
Search Settings for eSIM or SIM manager. Menu wording changes with the manufacturer, software version, and regional device configuration.
- Code on the same phone: Look for an image or gallery button in the scanner. Supported Pixel flows allow you to upload the saved QR picture.
- Camera won't focus: Choose Enter activation code if available.
- Device identifiers requested: Find the IMEI and EID in the phone's About settings, and provide them only through the legitimate activation process.
Before leaving home, identify the setting that selects your mobile data SIM and confirm that the new line is available there. Select it when you're ready to use the travel connection, following the plan's activation timing.
Keep the installation connection and the travel connection separate in your mind. Wi-Fi downloads the profile; the travel line supplies mobile data once it connects in a covered destination.
Manual Activation Codes and the One-Tap Alternative
Manual activation uses the same information as the QR code. It bypasses the camera, not the provider's download and authentication process, so you still need internet access.
An activation string commonly follows the structure LPA:1$<SM-DP+ address>$<matching ID>. The server address identifies where the phone requests the profile, while the matching ID identifies the assigned installation. Don't construct this string yourself or substitute details from another order.
Enter the supplied details accurately
On iPhone, use Settings > Cellular > Add eSIM > Use QR Code > Enter Details Manually, then enter the supplied details and continue, as described in Apple's manual eSIM deployment guidance.
The phone may show separate fields for the SM-DP+ Address and Activation Code. Put each value into its matching field rather than pasting the whole activation string everywhere.
Copy and paste when possible. Check for an accidental space, a missing dollar sign in a full string, a zero mistaken for a capital O, or changed capitalization. Don't add a web-address prefix before the server name, and include LPA: only where the installation instructions require the full string.
Choose the route that fits your screen
- QR scanning: Convenient when your email is open on a laptop, tablet, or another phone. It avoids typing long activation details.
- Manual entry: Useful when the image is damaged, the camera won't focus, or no second screen is available. Keep the original email open so you can compare every field.
- One-tap installation: Opens the supported system installation flow from the phone you'll use abroad, without a camera or manual typing. Our Smart Link explanation describes that route.
One-tap installation is particularly convenient when you purchase and open the delivery email on the same phone. You'll still need to approve the system prompts and let the download finish.
For the complete sequence, including preparing your device and checking the line afterward, follow our eSIM setup walkthrough.
Common Problems and How to Fix Them
First establish where setup stopped. If the phone never recognizes the image, investigate the camera, display, formatting, or device support. If carrier details appear and the next step fails, the camera has already done its job.
A successful scan doesn't establish that the profile can download or connect. IDEMIA's discussion of eSIM onboarding challenges highlights compatibility and differing activation workflows, which help explain why a readable code can still lead to unsuccessful setup.
Match the symptom to the stage
eSIM QR code symptoms, causes and fixes
| Symptom | Likely cause | First fix |
|---|---|---|
| Camera will not read the code | Glare, dim screen, or image too small | Raise screen brightness, enlarge the image, or use manual entry. This is a quick local check. |
| Code reads but download fails | No internet or unstable connection during installation | Connect to stable Wi-Fi and retry once. Persistent failure needs provider review. |
| Activation says code already used | Code was installed earlier or is consumed | Stop rescanning and contact the issuing provider. |
| Line installed but no data | Line not turned on, data roaming off, or wrong data line | Turn the line on, enable Data Roaming as instructed, and select it for data. These are quick settings checks. |
| Connects only partly or to the wrong network | Possible regional profile mismatch with destination | Check destination coverage and contact support if the intended service remains unavailable. |
| Phone cannot install the eSIM | Device not eSIM-capable or carrier-locked | Verify compatibility and lock status. Unlocking or profile eligibility needs the relevant provider. |
Don't delete an installed line just because data isn't working. First open Cellular or SIM manager and see whether the profile is already present. Deletion can turn a settings problem into a replacement-profile request.
A new picture of the same activation details won't repair a consumed installation credential.
A different network name on screen isn't automatically an error, either. Travel connectivity can use partner networks, so compare what you see with the plan's connection instructions rather than expecting the seller's name.
Send support details that identify the failure
If the local checks don't resolve it, send:
- Exact error: Copy the on-screen wording or attach a screenshot with private activation details hidden.
- Device information: Include the model and iOS or Android version.
- Installation connection: State whether you used home Wi-Fi, airport Wi-Fi, or mobile data.
- Previous attempts: Explain whether the code was scanned before and whether a new line appears in settings.
These details distinguish recognition problems from download rejection and network registration issues. Our eSIM not working troubleshooting guide provides additional checks for an installed line that still won't connect.
Reuse, Limits and a Final Line Check
An eSIM QR code is generally tied to an installation, not unlimited reuse. Once the profile has downloaded, using the same image on another phone, or reinstalling after deletion, may produce an already-used message. The issuing provider's policy determines whether a replacement or transfer is possible.
Keep the screenshot and activation details private. Don't post them in a public forum or share them in an unredacted troubleshooting screenshot. If setup stopped unexpectedly, check whether the line exists before asking the issuer to review the installation status.
Know what your connection includes
Our service is data-only: it doesn't support SMS, voice calls, or bank verification codes by text. Your usual number can remain active on your home line for calls and texts while you use the travel line for mobile data.
Before traveling, confirm how your bank sends verification codes and whether your home line can receive them abroad. Keeping that number enabled doesn't remove your home carrier's roaming terms or possible call charges.
Make the final check at home
While connected to Wi-Fi, open your SIM settings and confirm the travel line is installed and can be enabled. Check that you know how to select it for cellular data when you arrive.
This is a settings check, not proof of overseas coverage. Wi-Fi can hide whether cellular data works, and a destination-only profile may not register at home. Once you land, select the travel line and test a webpage with Wi-Fi off.
If you still need a connection, browse our travel eSIM destination plans and compare coverage with every stop on your itinerary.
Simsima offers prepaid travel data with installation details delivered digitally, so you can prepare your connection before departure. Visit Simsima, check your destination and device compatibility, and choose QR scanning or Smart Link to get your phone ready for arrival.


#eSIM QR code#eSIM installation#travel eSIM#iPhone eSIM#eSIM activation

Dimitri MorvanFounder
Founder of Simsima. A passionate traveler based in Barcelona, he helps travelers stay connected without breaking the bank on roaming fees.
LinkedIn